Tarsus, The First Martyr |
|
|---|---|
 |
|
| Location | Martyr's Altar |
| Rewards | 1x Glimpse of Insignificance 1x Nascent tar 1x Crystalline Gland |
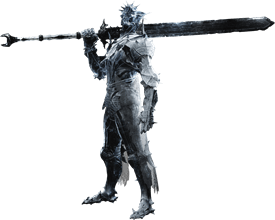
Tarsus, The First Martyr is a Boss and Enemy in Mortal Shell. Tarsus, The First Martyr can be found at Martyr's Altar.
Tarsus, The First Martyr Information
- An armored knight wearing a pale armor and wielding a giant broadsword.
Tarsus, The First Martyr Locations & Drops
- Tarsus, The First Martyr can be found at Martyr's Altar
- Rewards:
How to Beat Tarsus, The First Martyr
Tarsus, The First Martyr Boss Guide:
Phase 1
The battlefield is not very large. Stay away from the mist, you will become chilled and damaged if you get near.
Tarsus will start the fight by charging at you and then he will fade into the mist. Turn left or right to avoid him. He will repeat this three times before he engages you.
Tarsus can vanish and reappear at will. It's hard to predict where he will spawn, but you can hear him before you actually see him, so try to pay attention to his steps and you'll be able to know where he is coming from before you actually see him. You'll lose track of him, so remember to use your tracking button when he reappears.
He performs both quick and slow actions, so don't lower your guard or you'll get hit a by one of his quick attacks.
When you deal enough damage he will drop to his knee. Make sure to deal as much damage as you can when this happens.
Phase 2
After his health drops to 0 his appearance will change, and he will gain new attacks. His recovery times won't change, but he will become more hostile. He will also become incredibly evasive when not attacking.
Try to stay at a medium distance and bait his attacks. Use your hardening to prevent the damage and strike back.
When he uses Ice Spikes try to run as far away as you can and use your Ballistazooka to strike him.
Attacks & Counters
| Attack | Counter |
| Phase 1 | |
| Charge Attack: He will slide towards you with his weapon and vanish into the mist. | Use your Hardening to prevent the damage or dodge left or right before he strikes you |
| Two Hit Combo: He will appear and perform one swing from each side | Use your Hardening to prevent the damage. You can also use your parry to cancel his attack |
| Three Hit Combo: He will perform a swing from each side and then a powerful swing from above | You can parry the first two strikes but the last one is unparryable. |
| Ice Storm: He will strike his weapon into the Ice and then conjure a wide AoE storm that deals damage per second and freezes you while you remain inside. | If you are close enough, you can hit him a couple of times before the storm begins. Once it does, you can either use your hardening or run away until its over. If you are far away, you can use this chance to fire your Ballistazooka. |
| Sword Throw: When confronted from a distance, he will throw his sword at you, and then rush forward to recover it. Once he does, he will jump while attacking you. | Dodge left or right to avoid the sword and then use your hardening to prevent the jump damage. Use this chance to strike back |
| Phase 2 | |
| Slide Thrust: He will slide forward and thrust you with the point of his sword. He can do this more than 1 time in quick succession. | This attack has very long reach. Try to use your hardening to avoid the damage and strike back. |
| Three Hit Combo: He will rush forward and perform one hit from each side and then a powerful hit from above. | Use your parry to cancel the combo. You can also use your hardening and then roll backwards |
| Ice Spikes: He will swing his weapon backwards and then strike the ice with it. Spikes will come out from the ground freezing you and dealing moderate damage. | You can hit him a couple of times before he strikes the ice. After that run as far away as you can and use your Ballistazooka to hit him. |
Notes & Trivia
- The optional soundtrack for this bossfight is "The Raven" by Rotting Christ.
